User guide
The OPTES guide
Every step with a picture of the app itself, from the download to your first project. The numbers on the pictures match the text under them.
1Download and install
OPTES Code for Windows 10 and 11 (64-bit) is downloaded from the official site only: optes3.com. Do not download it from any other link.

- 11. “Download OPTES for Windows”: starts the installer download.
- 22. The supported Windows versions, the file size and the version.
- 33. The SHA-256 line: the file's fingerprint, and the SHA256SUMS file.
Check the fingerprint (optional, recommended): open PowerShell in your Downloads folder, run the command below and compare the result with the SHA-256 line on the site. If a single character differs, do not run the file; download it again.
Get-FileHash .\OPTES-Code-*-win-x64.exe -Algorithm SHA256Windows SmartScreen: because the app is new, Windows may show “Windows protected your PC” on the first run. This is a general notice for recent apps, not a sign that the file is harmful.
- Click “More info”.
- Check that the file name starts with OPTES-Code and that you downloaded it from optes3.com.
- Click “Run anyway”.
Windows protected your PC
Microsoft Defender SmartScreen prevented an unrecognized app from starting.
1More info
Windows protected your PC
App: OPTES-Code-…-win-x64.exe2
3Run anywayDon't run
The installer: OPTES Code installs for your Windows account only; no administrator rights are needed.
- Choose the install folder, or keep the suggested one, then click Install.
- Wait for the progress bar to finish (usually a minute or less).
- Keep “Run OPTES CODE” ticked and click Finish. A shortcut is added to the desktop and the Start menu.
1Choose Install Location
C:\Users\…\AppData\Local\Programs\OPTES CODE
Install
2Installing
Please wait while OPTES CODE is being installed.
3Completing OPTES CODE Setup
✓ Run OPTES CODE
Finish
2First launch and sign-in
The app opens straight on the workspace in guest mode, so you can try it right away. Signing in makes your plan, usage and purchases follow your account on any device; your chats and files stay on your computer.
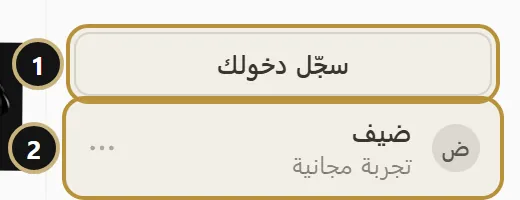
- 11. “Sign in”: opens the sign-in window.
- 22. “Guest · free trial”: you are in guest mode. Click it to open the account menu.

- 11. “Continue with Google”: the sign-in page opens in your browser (Apple and Facebook are offered there too).
- 22. Why the browser? Google does not allow sign-in from a window inside apps, to protect your account. Once you finish, the app picks it up by itself.
- 33. “Not now”: keep going as a guest and sign in later.
3A tour of the workspace
Everything is on one screen: the sidebar on the right, the composer in the middle and the chat tools under it.

- 11. “New chat”: a fresh chat with its own context and terminal (Ctrl+N).
- 22. “Tasks”: long jobs OPTES carries on step by step.
- 33. “Add-ons”: skills, tools and connectors you switch on and off.
- 44. Sections marked “Soon”: Students, Cybersecurity, Editing and series. Shown for reference; they open later.
- 55. The composer: write your request in any language or dialect and press Enter. It holds voice dictation and the send button.
- 66. The project chip: the folder OPTES works in. Click it to pick another folder.
- 77. The “+” button: attach files, a folder, images or a link, and “Add all project files”.
- 88. The mode chip (e.g. “Smart”): how it works, speed and the model.
- 99. The usage indicator: what is left of your plan's limit.
- 1010. Quick starters: “Fix a bug”, “Add a feature”, “Understand my project”.
- 1111. Account: sign-in, settings, appearance and language.
- 1212. “Workspace panel”: files, preview and changes beside the chat.

- 11. “Settings”: all settings (Ctrl+,).
- 22. “Account & plan”: your plan, usage and subscription.
- 33. The account row that opens this menu.
4Choosing a model
The model is picked from the mode chip under the composer. The same menu sets when OPTES asks for your approval, and the effort level.
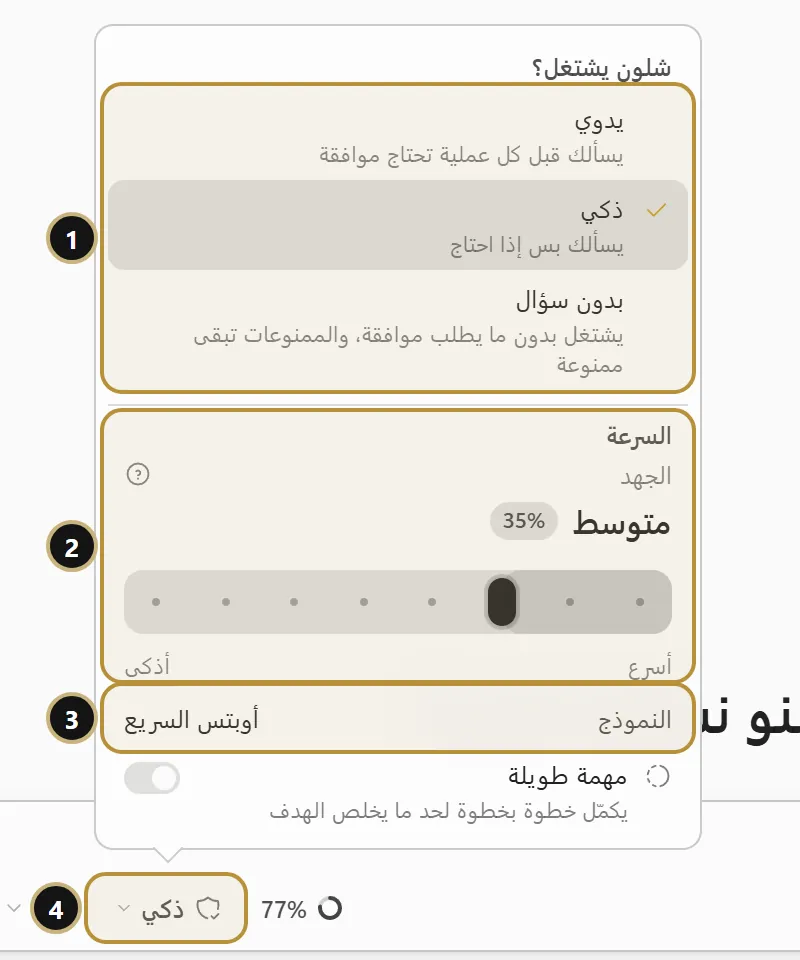
- 11. Approvals: “Manual” asks before every action, “Smart” asks only when needed, “No questions” works without asking while forbidden actions stay forbidden.
- 22. Speed and effort: move the slider towards “Faster” or “Smarter”.
- 33. “Model”: click it to open the model list.
- 44. The mode chip that opens this menu.
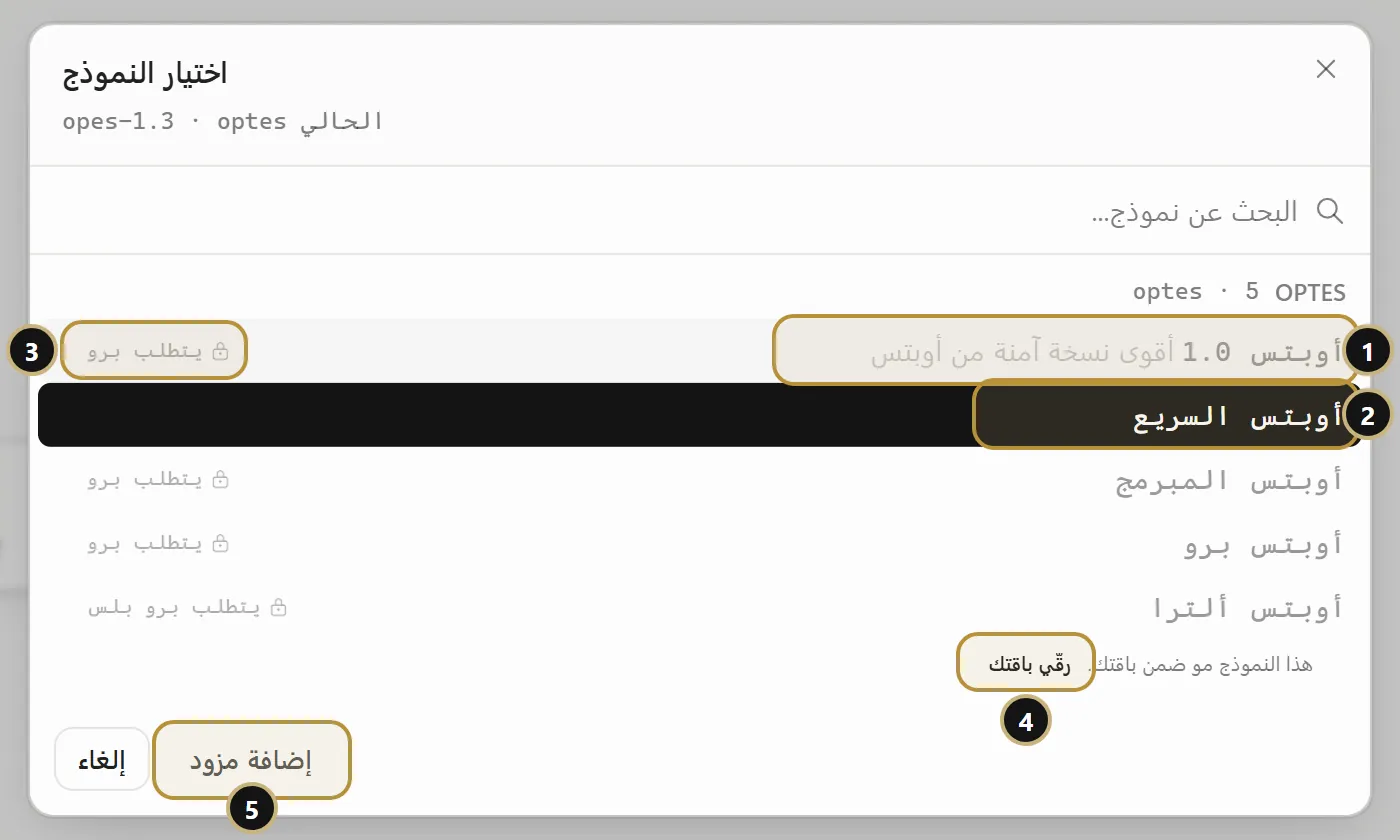
- 11. OPTES 1.0, always on top: “the strongest safe version of OPTES”.
- 22. The free model: available on the free plan; click it and start.
- 33. The lock and “Requires Pro”: the model is not in your current plan. Choosing it opens the plans page instead.
- 44. “Upgrade your plan”: takes you to the plans page.
- 55. “Add a provider”: add your own models with a key or an account (sections 6 and 7).
5Plans, subscribing and paying
Monthly prices in Iraqi dinars, fees included: Pro 15,000, Pro+ 50,000, Max 5x 144,000, Max 25x 288,000 IQD. You pay on Wayl's secure page; the app never asks for your card details.
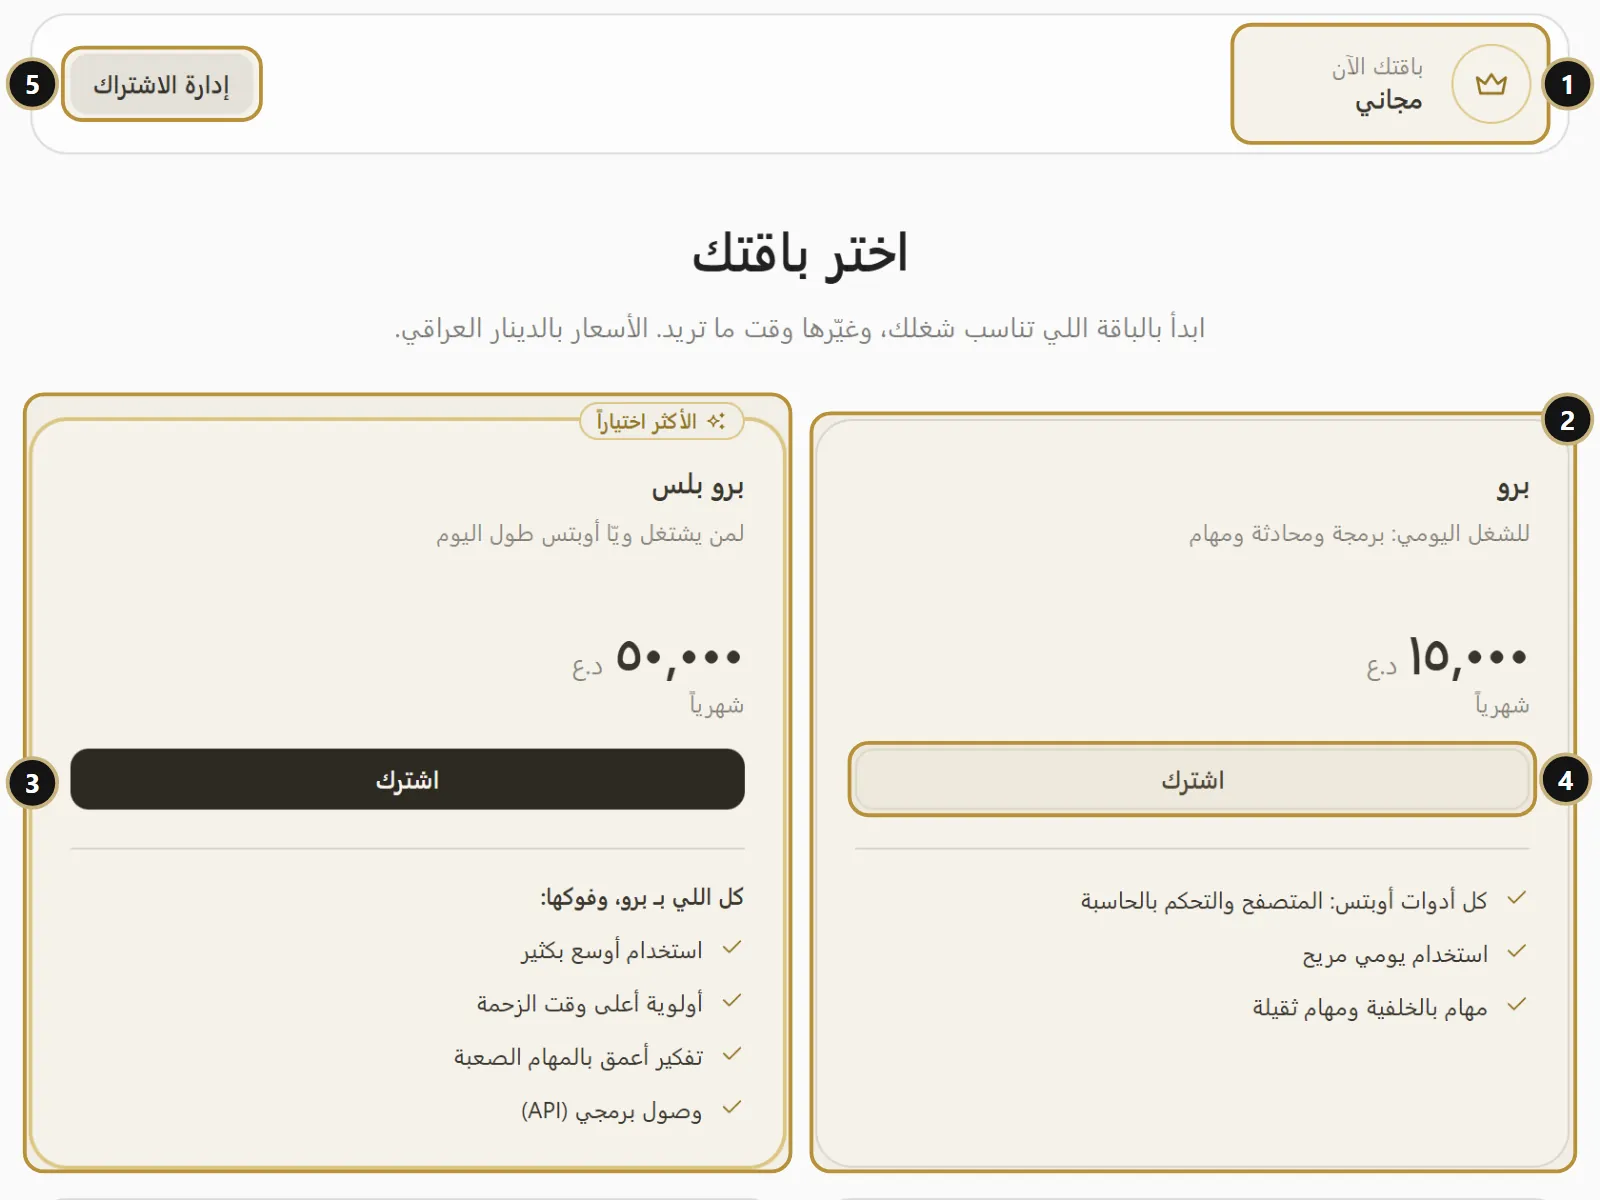
- 11. “Your plan now”: the current plan (here: free).
- 22. A plan card: what it includes and its monthly price.
- 33. “Most chosen”: the plan most people pick.
- 44. “Subscribe”: opens the payment page in your browser.
- 55. “Manage subscription”: renewal and cancellation.

- 11. Payment through Wayl, in your browser.
- 22. “Buy credit”: a fixed top-up when you need more than your plan's limits.
- 33. “Compare the plans in detail”.
You can also subscribe on the website: the plans page shows the same plans, and its “Subscribe” button takes you to “My account” on accounts.optes3.com.

- 11. A plan card and its price in dinars.
- 22. “Subscribe”.
- 33. The price note: the amount shown is exactly what you pay.

- 11. “Continue with Google”: use the same account as in the app.
- 22. The same account works in the app; payment happens on Wayl's page and we never see your card.
Paying through Wayl:
- Click “Subscribe” on the plan you want (in the app or on the site).
- Sign in with Google if asked.
- On Wayl's page choose a payment method: bank card, SuperKi, Zain Cash or FIB, and complete the payment.
- Once confirmed, go back to the app: the new plan shows in “Account & plan” within moments (click “Refresh” if it is late).
1Pick a plan
Pro · 15,000 IQD a month
Subscribe
2Sign in
Continue with Google
3Choose how to pay
Bank cardSuperKiZain CashFIB
4Paid
✓ Back to the app: your plan is active
6Adding your accounts and GitHub
If you already subscribe to another service, sign in with it and its models show in the model list under their real names. Where: Settings → “Advanced” → “Advanced connection” → “Your own accounts”.

- 11. Claude: signs in with a command in the terminal.
- 22. ChatGPT / Codex: opens a page in your browser where you enter a code.
- 33. GitHub Copilot: signs in with a command in the terminal.
- 44. The start button on each row: click it and follow the steps. The list also has Claude Code, xAI Grok, Qwen Code and MiniMax.
This is GitHub: to work on your GitHub repositories, pull requests and issues, switch on the GitHub skill in “Add-ons”.

- 11. “Add-ons” in the sidebar.
- 22. The “Skills” tab.
- 33. The GitHub row and its switch.
- 44. Its description: “Pull requests, issues, reviews and repositories on GitHub”.
7Your own API keys
Add an API key from any provider. The key stays on your computer and is hidden once saved; its models show in the list under the provider's name and do not count against your OPTES plan. Where: Settings → “Your own models”.
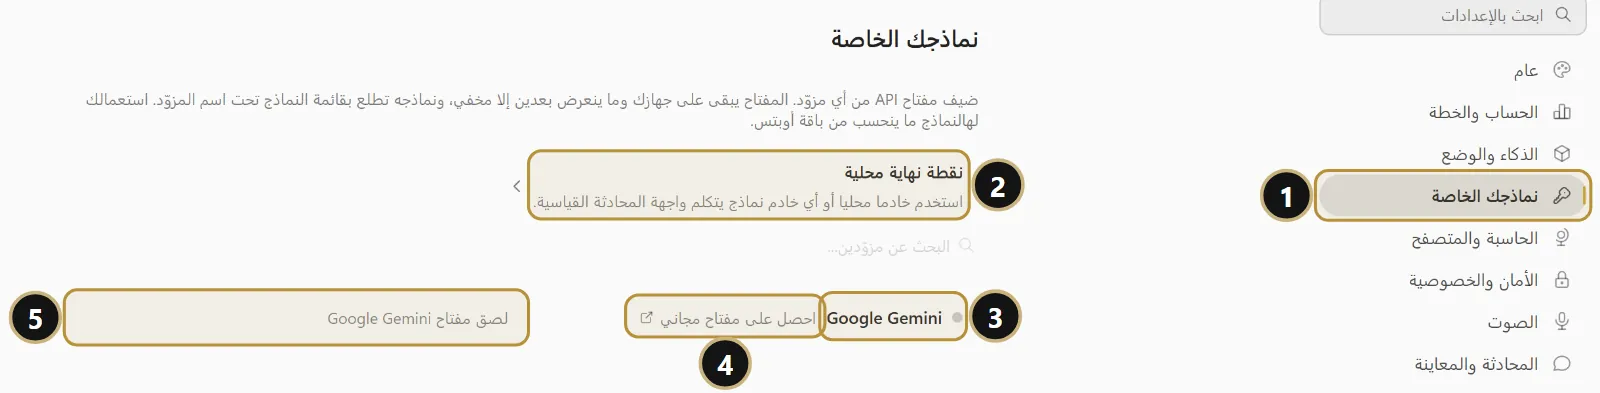
- 11. “Your own models” in the settings list.
- 22. “Local endpoint”: a custom provider or a server on your computer.
- 33. A provider card: its name and status.
- 44. “Get a key”: opens the provider's page to create one. Google Gemini's key is free.
- 55. The key field: paste the key and the provider turns on.
- Click “Get a free key” next to Google Gemini and sign in with Google.
- Create a key and copy it.
- Back in the app, paste it into “Paste your Google Gemini key”.
- Open the model list: the Gemini models are there by name.
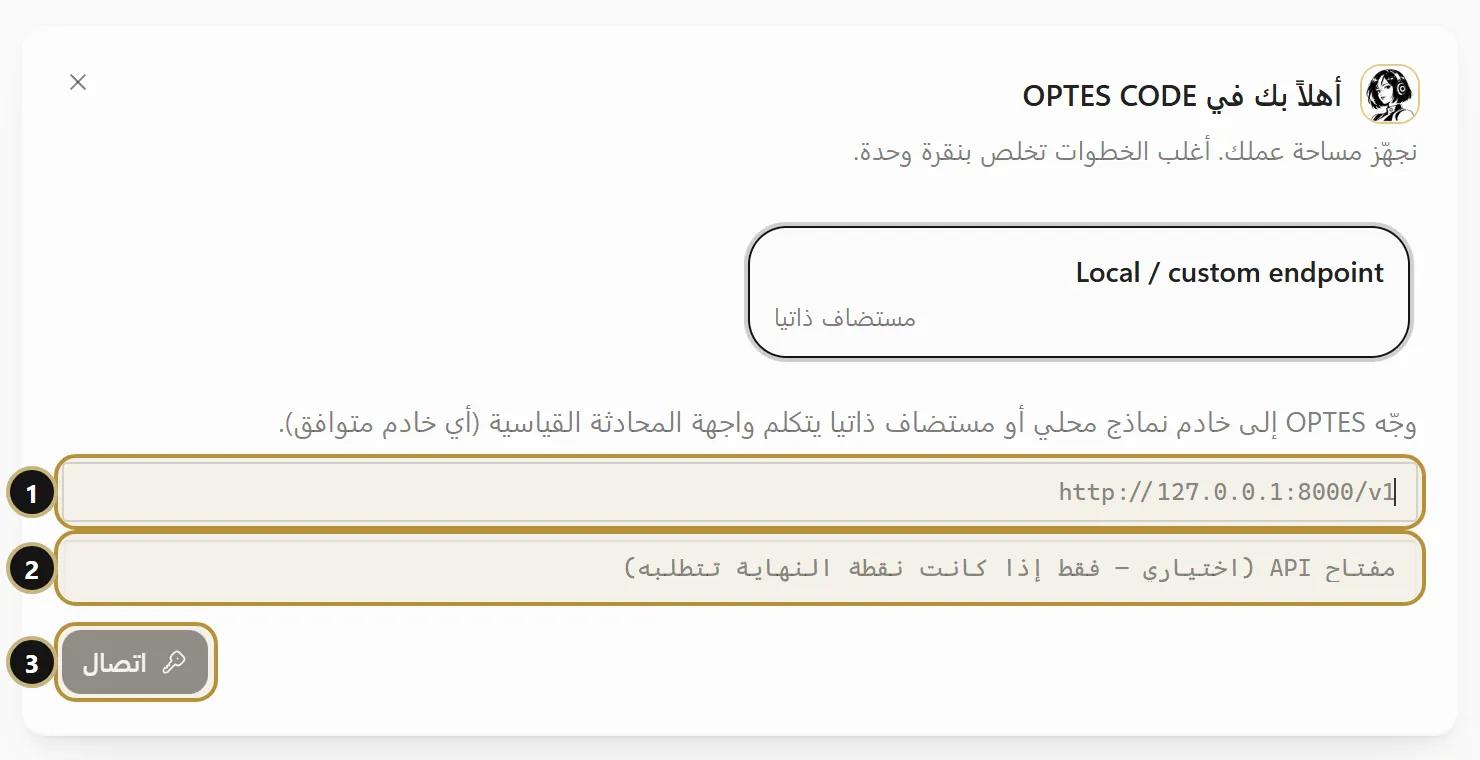
- 11. The address of a server that speaks the standard chat API, e.g.
http://127.0.0.1:8000/v1. - 22. An API key (optional, only if the server needs one).
- 33. “Connect”.
8Working on a project
OPTES works inside your project folder: it reads and edits files and runs commands, asking for approval as your mode says.
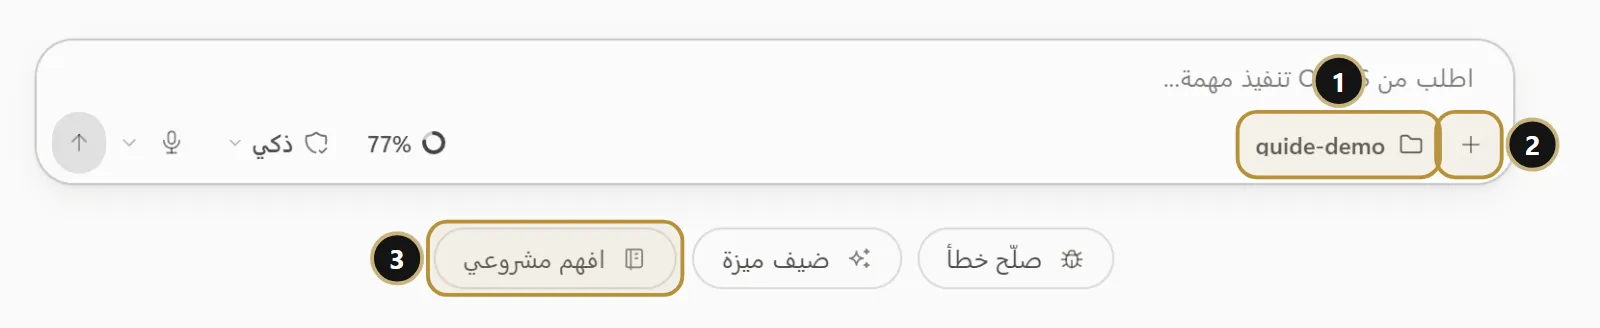
- 11. The project chip: click it and a Windows folder picker opens.
- 22. The “+” button: attach files and context.
- 33. “Understand my project”: reads the project and sums up its structure.
You can also just ask, for example: “Find the flower-shop project and understand it”. For a new project use “New project” in the sidebar.

- 11. Your request.
- 22. OPTES's answer after reading the project.

- 11. “Add all project files”: adds the folder index and its key files to the chat.
- 22. “Folder”: attach a whole folder.
- 33. “Files”: attach specific files.

- 11. The terminal opens in the chosen project folder.
- 22. Git ships with the Windows build: try
git --version. - 33. The “Terminal” tab.
9Updates
When a new version is out, a notice shows at the top of the screen. Nothing installs without your click, and updates come from optes3.com only.

- 11. “A new version of OPTES is available” and its number.
- 22. “Update now”: downloads it, checks its fingerprint and size, then asks you to confirm; the app closes and reopens by itself.
- 33. Dismiss: it comes back with the next version.
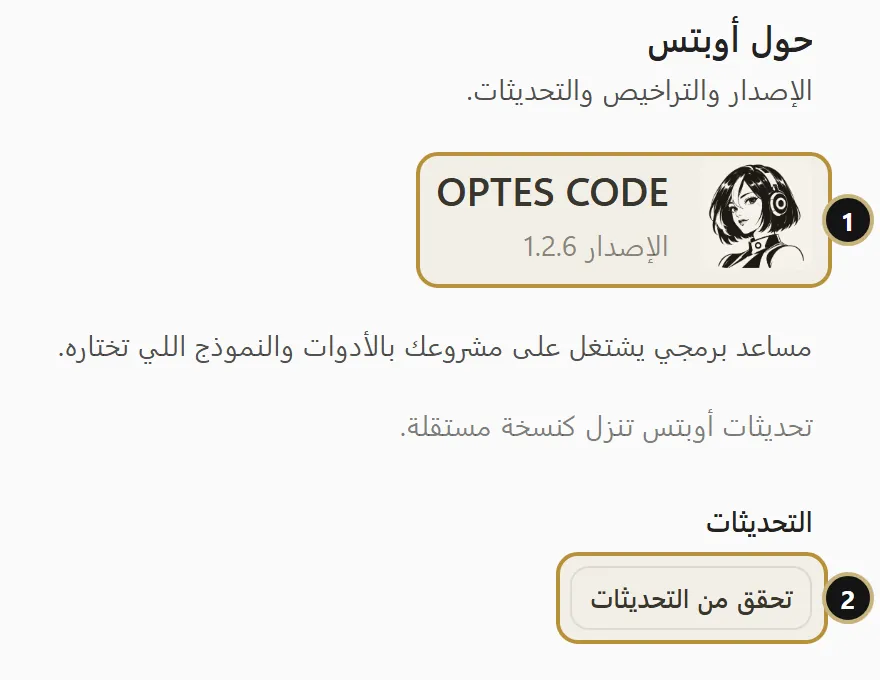
- 11. The installed version.
- 22. “Check for updates”.
10Usage and limits
Each plan has usage limits that renew by themselves. OPTES shows percentages and renewal times only, never amounts of money.
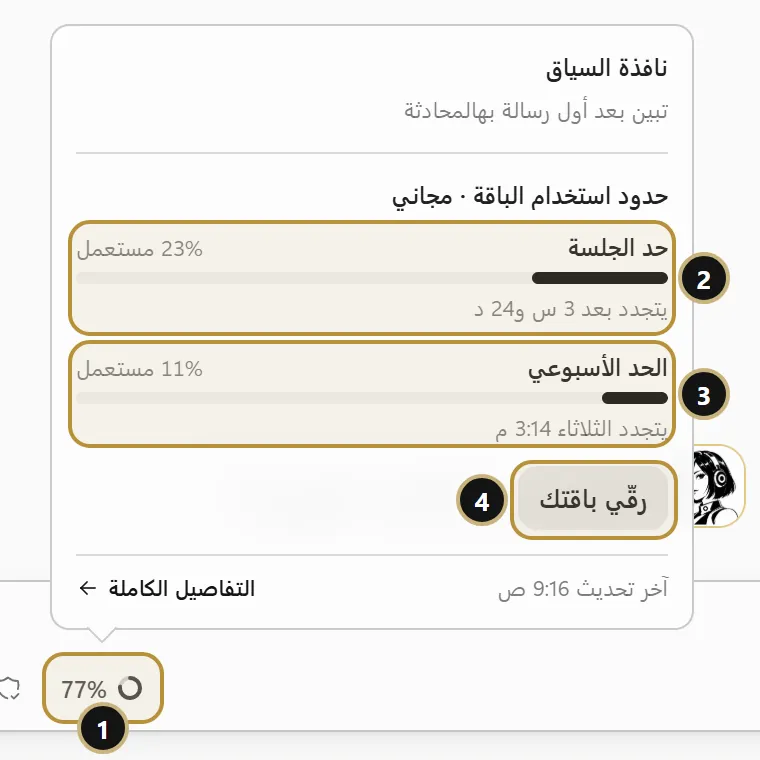
- 11. The indicator: what is left of the tightest limit (77% means 77% left).
- 22. “Session limit”: how much is used and “renews in…”.
- 33. “Weekly limit” and when it renews.
- 44. “Upgrade your plan” if you need more.

- 11. The usage percentage and its bar.
- 22. The renewal time and the number of “heavy jobs” left.
“Context window”, in the same popover, shows how full the current chat is; it appears after the first message.
11Troubleshooting and support
Windows says “Windows protected your PC”.
Click “More info”, then “Run anyway”, after checking the file came from optes3.com and its fingerprint matches (section 1).
“OPTES 1.0 is not available right now”.
The service is busy or being updated; you do not need to do anything. Try again shortly, or pick another model.
“You reached your session limit”.
The session limit renews by itself after the time in the message. Need more now? “Buy credit” or upgrade (section 5).
Where are the minimise, maximise and close buttons?
On Arabic Windows they sit at the top left of the window and no longer cover the app's buttons (since 1.2.6).
Sign-in is stuck on “Waiting for the browser”.
Finish in the browser that opened. If you closed it, click “Open the page again”, or “Cancel” and try again.
The update failed.
The reason shows under “Updates”, e.g. a dropped connection or a fingerprint mismatch (the file is deleted, never installed). Click “Try again”, or download the new version from the site.

- 11. The message; close it with ×.

- 11. The message and the renewal time.

- 11. Close, maximise and minimise.
Ready to start?
Download the app and come back to this guide whenever you need it.